MikeCRM specializes in customer relationship management. It's time for you to import existing contacts to your MikeCRM account, by which you can manage the relationship with them in a more effective manner.
Operating Procedures
1 Entry
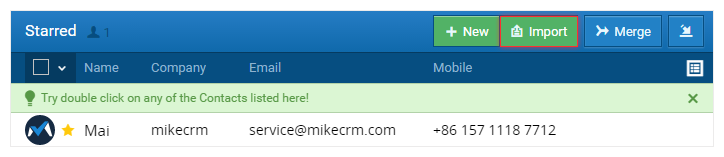
After you've logged in, you can enter the Import Contacts page by clicking the "Import" button at the top right corner of the Contact List page.
2 Import contacts file
You can upload a contacts file by clicking the "Select a File" button or dragging & dropping the file from your computer into the dashed box as the picture shows below.

Tips: a common spreadsheet file like csv, xlsx, xls, less than 8M is supported to be uploaded. You may click here to download the exampled file. If the number of contacts contained is more than 10,000, please split the file into smaller ones and upload them one by one.
3 Set the data range
After you've chosen the file to be uploaded, you'll enter a page to confirm the Header row and the Tail row of the imported data, as shown in the picture below.
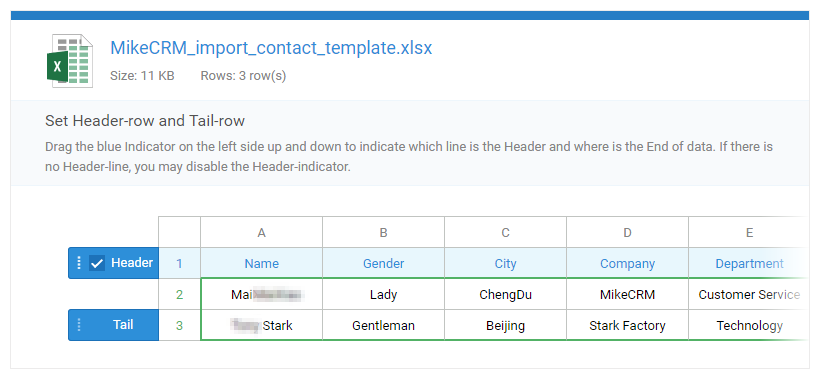
You may drag the "Header" button and the "Tail" button at the left side to limit the data range you want to import from the file.
The header row, namely the first row of the file uploaded, should not be a concrete data row, but a row that defines the column names of the imported data like "Name", "Mobile Number" etc. The information in the Header row won't be imported as a contact, but works as data markers to correlate the data with the corresponding contact information items in MikeCRM. For example, your uploaded file has a column named "Mobile", the data in the "Mobile" will be imported as the contacts' Mobile in your MikeCRM account.
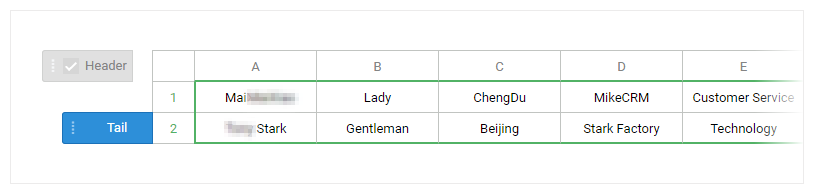
If the uploaded file doesn't have a qualified header row, the procedure can work fine. You may uncheck the "Header" button firstly (as the picture below), and then set the header mapping manually at the next step "Set Heading-mapping" to link the imported data with the corresponding contact items.
Meanwhile, setting the "Tailor" row helps you exclude the data that you don't want to import. For example, the uploaded file has ten contacts while you only want to import the first 5 contacts. In such situation, you can drag the "Tailor" row to the end of the fifth contact and the 5 contacts after the row won't be imported. Besides, you may exclude some auto-generated ending of the file, such as copyright information, system environment log, or created date by dragging the "Tailor" row to the end of the last contact row so that those non-contact data won't be imported.
4 Set head-mapping
Having set the data range to be imported, you may click the "Next" button to the step "Set Head-mapping".

The main body in this page is still the spreadsheet you uploaded. Right above the spreadsheet, there is one more row that displays the contact information fields in MikeCRM system. The column text of the header should correspond the contact field in MikeCRM one by one. For instance, the Name column should correspond to the Name field in MikeCRM, and the Mobile column to the Mobile field. By doing so, the uploaded data can be related to the right fields of contact information in MikeCRM. The system can automatically recognize some part of information based on the header text and data format of the uploaded file. If the system fails to recognize the information, don't worry! You can make it right by clicking the dropdown arrow and choosing a right corresponding field.
Tips: since some people may have multiple contact information such as several mobiles, emails, IM accounts, you can import all of them at one uploading. Taking the Mobile for example, there are two method to import multiple mobile numbers.
(1) The uploaded file has two columns of Mobile and each column shows one mobile number respectively.
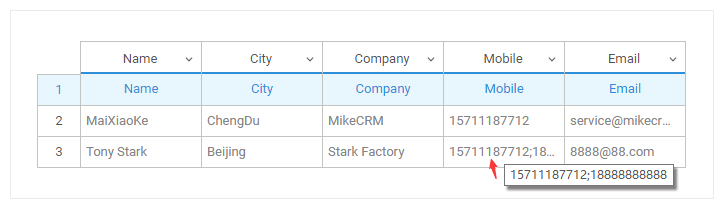
(2) The uploaded file only has one column of Mobile. But there can be multiple mobile numbers separated by commas within one cell, like the picture below. After the file is imported, the system will add multiple mobile numbers for the contact.
After the completion of the header settings, the next important task is to group, tag and star the contacts imported.
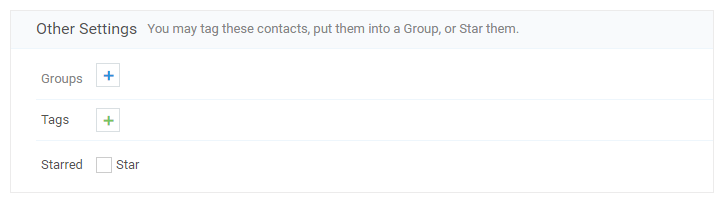
It's highly recommended to set a unified tag or group (tags or groups are also available) for the imported contacts, which will make them more distinguishable. As the number of contacts increases in your account, you'll find the groups and tags are excellent assistants to classify and manage contacts.
5. Perform the import
Completing the above settings, you can click the "Next" button to finish the importing and view the imported contacts in your account.
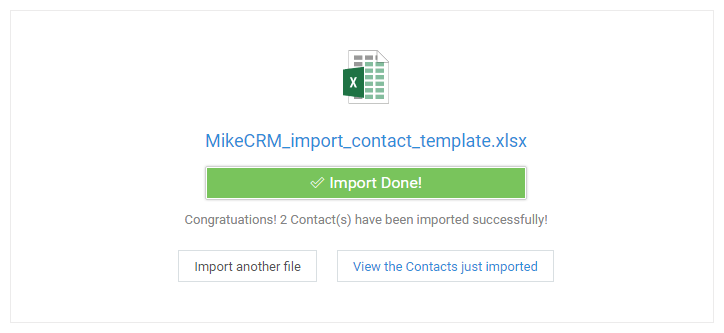
Tips: it's recommended to use the "Merge Contacts" feature to merge duplicated contacts after you've imported contacts from a file, which will increase the data accuracy and your efficiency to manage contacts. Besides, you may click the "Filter" button at the top left of the contact list to sort out the "last imported" contacts and do further management.